

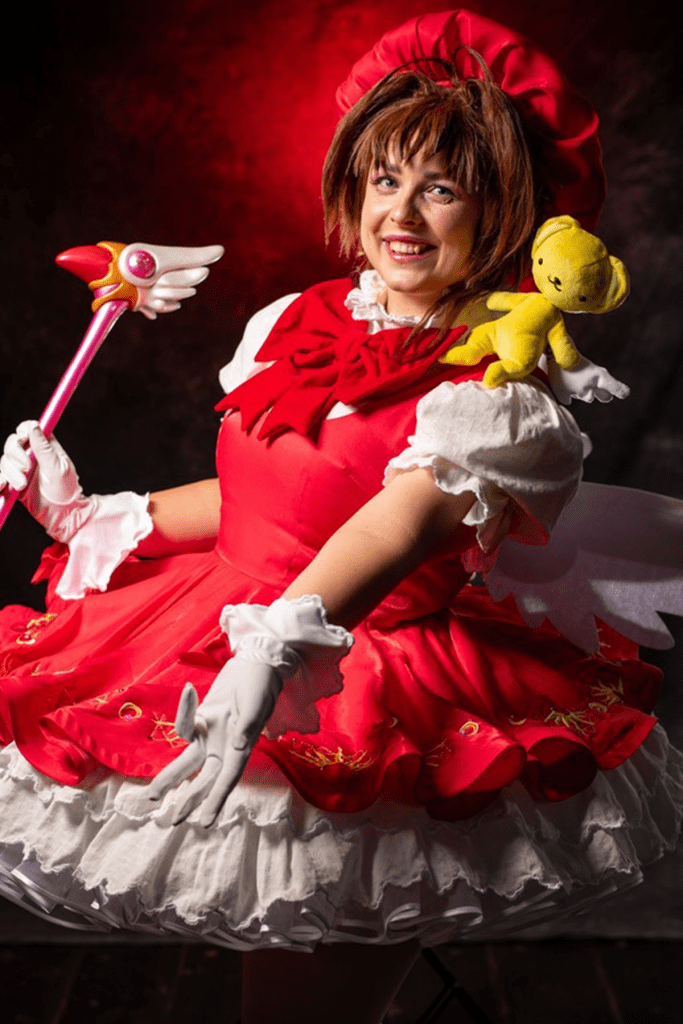
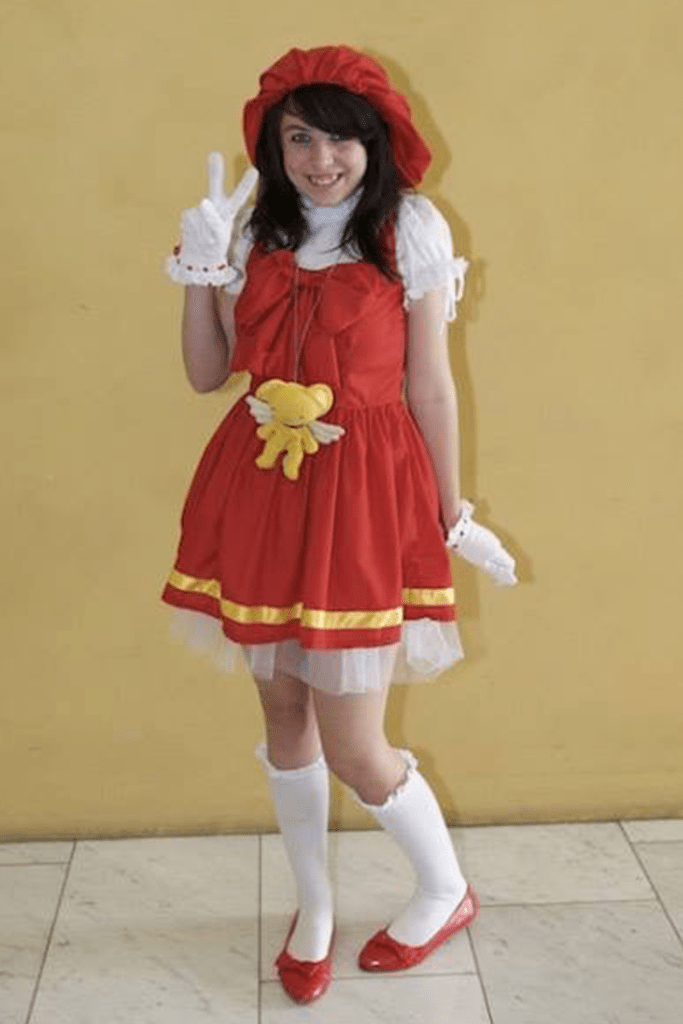
Sakura Kinomoto – Opening Dress : Cardcaptors
Made for : Overload 2024
Awards : 2nd in construction – Overload 2024
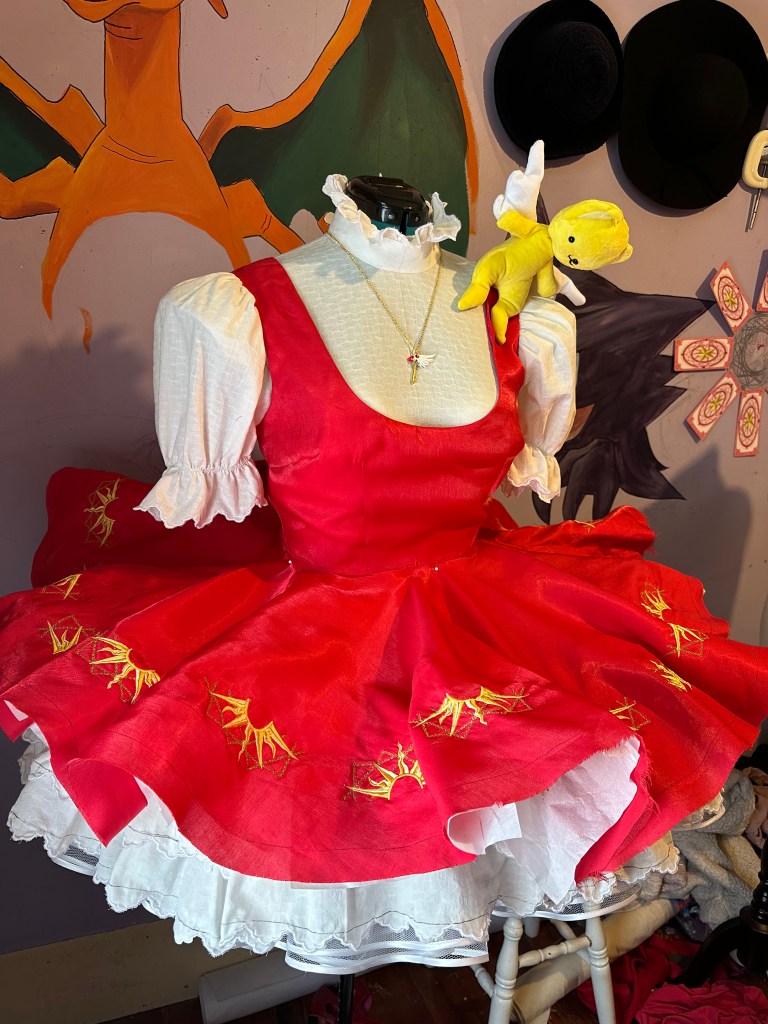
Background : In 2008 I made my very first costume ever which was Sakura’s opening dress from Cardcaptors. Fast forward to 2018 and to celebrate the 10 year anniversary of my first costume, I started remaking it. I then had a whole bunch of life events happen and the remake got put away in a suitcase where it sat in storage until 2024. I decided at the end of 2023 that I would try my hand at entering the cosplay competition at Overload again, it would be my first time entering since they had changed the rule that all costumes must have some sort of Japanese origin. A perfect chance to finally finish that Sakura costume. I pulled it out and very quickly realized that it would not fit me and the sewing was less than great so, I started again from scratch. Though I did keep the velvet bow from the 2018 version.
gallery


Things used :
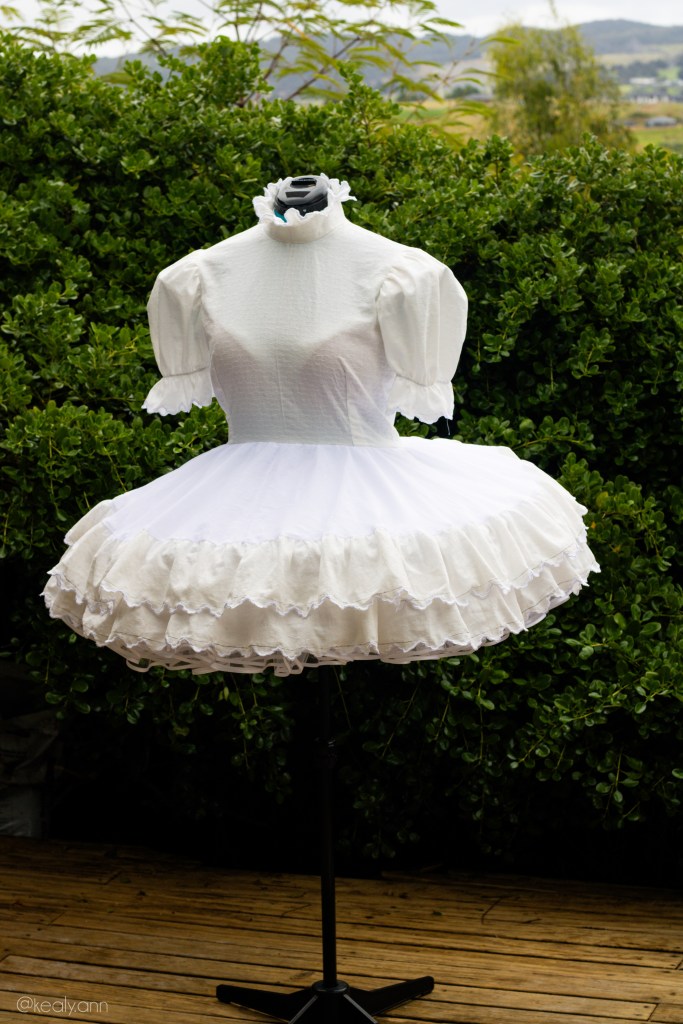
White underdress
- Simplicity 8444
- 5m off-white cotton jacquard
- 2.5m white cotton muslin
- white interfacing
- 24″ invisible zip
- .5m 1cm elastic
- .5m off-white satin ribbon
Red dress
- Butterick B5748
- 5m red/pink shift fabric
- 1m pink cotton lining
- 14″ invisible zip
- 8m horsehair braid
- assorted rhinestones
Accessories
- 1m red/pink shift fabric
- .5m buckram
- .5m batting
- .5m millinery wire
- 1m horsehair braid
- Vogue V8311
- .5m white 4 way stretch spandex
- .5m red velvet
- 3m red satin ribbon
- 1m stiff white felt
- wire
- 1x white dance tights
- 1x nude dance tights
- 2m scalloped white lace
- .5m elastic
Petticoat
- 5m hoop steel
- 2.5m white cotton drill
- 5m cotton twill tape
- 1m wide elastic
- 2m white cord
- 10m stiff white tulle
- 40m white satin bias tape
Props
- 1x large hardcover book
- .5m red linen
- gold HTV
- white HTV
- assorted rhinestones
- 8x gold book corners
- .25m red cotton tape
- cream card
- red card
- 1m white mink fabric
- 2x teddy bear safety eyes
- 1x teddy bear safety nose
- tiny bit of white Malibu feather trim
- teddy bear stuffing
- magnet
- teddy bear plastic pellets


construction
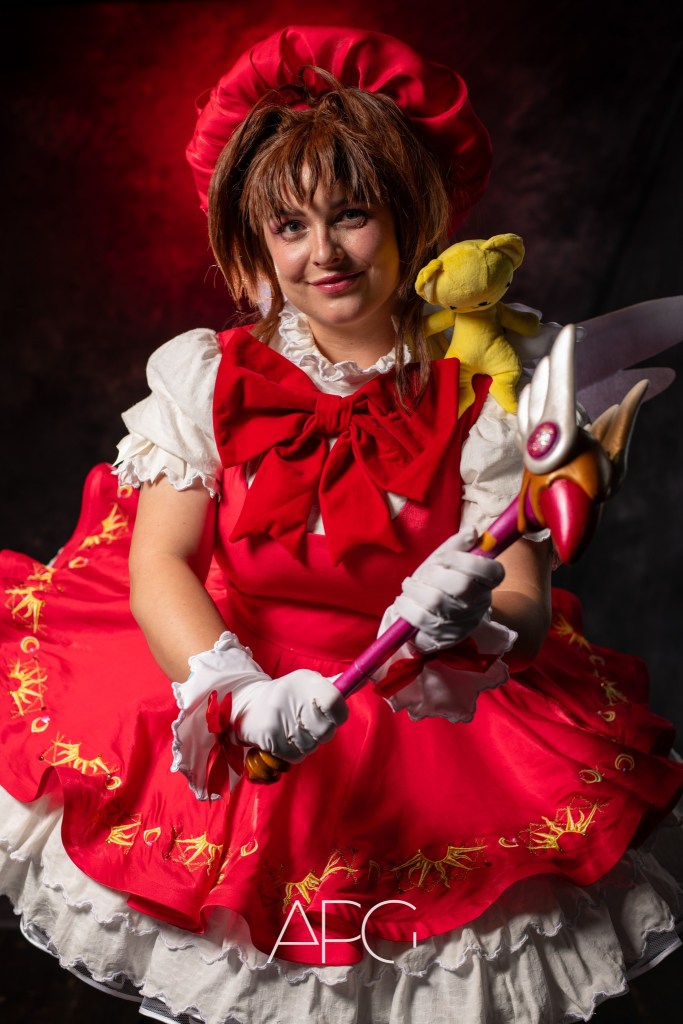
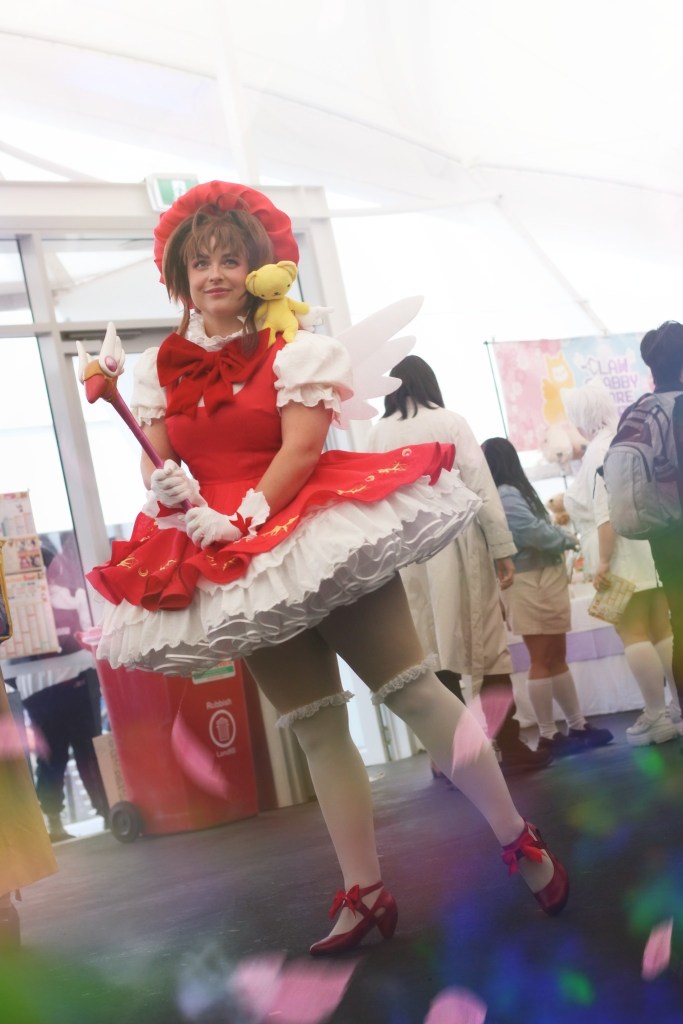
Accessories : Aka the hat, gloves, wings and bows.
Hat : I initially started by following a beret pattern in a vintage millinery book I had. I made a band from buckram reinforcing the top and bottom edges with a millinery wire which was hand sewed in place, this became the brim base. For the crown, I originally cut out two circle pieces of the buckram like the book called for but after sewing them together and to the brim I realized it wasn’t anywhere near as large and fluffy as I wanted so I scrapped it.
For the second attempt at the crown I drew a huge circle on buckram, cut it out and gathered the outside edge before sewing it to the brim, sort of like a giant shower cap. Next I cut this same circle shape from batting and the same red fabric as the main dress, I also cut a long rectangle twice the width of the brim but just a fraction longer. I sewed the rectangle to make a loop, folded it in half and then hand-stitched it to cover the brim on the buckram frame. I gathered the edges of the two large circles and covered the crown on the frame with it hand-sewing it to the brim. I then did a tacking stitch in the center of the drown through all layers so that once I attached the bow, it wouldn’t drag the whole thing down.
Gloves : I used Vogue V8311 view C as the base pattern. Originally I had brought a white bridal satin to make the gloves from not realizing that the pattern called for a 2-way stretch fabric. I thought I could get around this by cutting all the pattern pieces on the bias. After making the first glove it was very apparent this wasn’t going to work. So I brought a four way stretch spandex instead and made them up from that. After making the gloves according to the pattern instructions, I got to the point where I wanted to add the scalloped cuff she has to them. I cut the gloves so that they ended at the wrist and began making the cuff.
For the cuff I cut a 3/4 circle and added a scalloped edge by embroiding along the outer edge using a design I had made with my embroidery machine. I then sewed the side seam up and sewed them to the glove.
Wings: I drew out her wings on a paper template and pinned them to my dress form making sure I was happy with the size/shape. I then transferred the pattern to a stiff white felt and cut them out whole. Next I trimmed the template back so it was just the top feather and cut that from the felt as well. Using some wire, I made a ‘U’ shape, wrapped it in cotton twill tape and glued it to the top feather piece of the whole wing. Then I glued the single feather piece on top incasing the wire. It is worn by slipping the bottom of the ‘U’ in to the back of my dress. I chose to make them from felt so they would be lightweight and when people at conventions inevitably walked in to them, they wouldn’t break and/or hurt the person.
Bows : For the small ribbon bows (gloves, blouse sleeves and shoes) I followed this YouTube tutorial.
The hat bow was made in a similar way, the fabric instead being the same as the hat fabric. First I had to make tubes from the fabric and I stuffed the bow part with a wide horsehair braid so it would keep its shape. The tails were cut long and had ‘>’ shapes cut/sewn in to the ends. It was sewn to the hat where I had originally put the tacking stitch.
The bow for the blouse was made from velvet which was actually made for my 2018 version. It was made in the same way as the hat one but not horsehair braid was added as it was already stiff enough on it’s own. I sewed a pin clasp to the back of the knot and it wins in place to the white blouse.
Petticoat : I did some research in to pancake tutus which are used in ballet to get the skirts to stick straight out horizontally. That lead me to purchasing this hoop skirt from AliExpress. When it arrived I tried it on and it was too small in the waist for me. I also HATED the fabric it was made from which was a cheap acetate. So I took the hoop steel from it, used it as a pattern and remade the whole thing from a white cotton drill, making sure to give it a wider waist. I added cotton twill tape for the hoop steel guides, and added a drawstring to the waistband to help with keeping it in place under the weight of all the layers that would sit on top.
Next the petticoat! I started by following this tutorial on YouTube except I had only brought 10m of tulle instead of the 12 that they use but I made it work. I made the bottom two tiers of the petticoat the same as the tutorial, but I covered the raw edges of the bottom in a satin bias tape because I didn’t want to feel the scratchy edges of the tulle on my skin. Once the two tiers were finished I pinned them to the hoop skirt to get an effect of how they would look when the whole thing was finished. It was at this point I decided to sew the tiers directly on to the hoop skirt. I t still gave the effect of wearing a full, fluffy petticoat, but it also meant the tulle wouldn’t be up against my skin at all.
White underdress : I used Simplicity 8444 as the base and used a gorgeous cotton jacquard that had a Sakura blossom design woven in to it. The first things I did was to remove the center front closure and change it to a zip in the back. All I did to achieve this was cut the front pieces on a fold and add a 1.5cm seam allowance to the center back pieces. Next I shortened the blouse so that it finished at the waist line.
For the neck and sleeve hems, I added a scalloped edge embroidery that I had designed. The sleeve embroidery was added directly to the bottom edge of the sleeves whereas the neck was a long rectangular strip that I gathered down and added in between the collar piece.
I also added insets to the sleeves following Vogue V1905 to help them keep nice and poofed up at all times.
For the skirt, I cut two circle skirts from a light muslin (to help with weight), one about 4 inches longer than the other. I then created two lots of really long rectangles out of the cotton Jacquard, that I embroidered the scalloped design along one edge. These rectangles got gathered along the top edge and sewn to the circle skirts.
Red dress : I started with Butterick B5748 as the base, it’s the same pattern I used for my 2018 unfinished version and I like the simplicity of it. Alterations wise, all that needed to be done was to lower the scoop of the neckline in the front, move the zipper from the side to the center back, shorten the skirt length and add an extra circle skirt to it making the skirt a double circle skirt instead of a single.
For the fabric, I found this pink to red color shifting fabric on AliExpress that I thought would be perfect because every reference of Sakura’s dress has a different shade of red or pink to it.
The bodice is lined in a pink cotton fabric. Horsehairbraid was added to the hem of the skirt to give it that anime flounce look.
For the yellow design along the bottom of the skirt, I designed an embroidery based on the designs and symbols on the Clow Cards. I spent ages supervising my machine as it added the embroidery. Once it was done, I used some left over gems and rhinestones from my Padme dress and added them to the embroidery for a bit of extra sparkle.
Props : When I first made this costume in 2008, I only had a Kero to go with it. I knew that when I made it again I would want to have the Clow Book and wand as well.
Book : Made from an old Stephen King book I found at the secondhand store. I cut a hole in the pages so I could fit some cards and my phone/wallet inside. The pages were then coated in glue to fix them in place.
I recovered the book using a red linen and cut the designs (which I made myself using photoshop), from a heat transfer vinyl using my Cricut. I then finished the edges with gold book corners, and some gems/rhinestones.
Kero : I found this free pattern by Sew Desu Ne online. I made mine from a white mink fabric that I had to dye the right shades of yellow. I created an embroidery file for the swirls on the wings.
He’s stuffed with stuffing and has a weighted pellet sachet in his butt that also contains a magnet so he can sit on my shoulder.
Wand : I found this 3d file online. An Instagram follower of mine printed the file and prepped it for me so all I had to do was paint it once it arrived. I do currently have a second one printed that I’m going to do the rod part with a wooden dowel so it’s less fragile.
progress photos


3 thoughts on “Sakura Kinomoto | 2024”