

This was never my story. It’s yours. Now, don’t screw it up, okay?
Babydoll – Sucker Punch 2011
I’ve made this costume four (possibly five?) times since 2011. This first attempt was right as the trailer dropped and I got my hands on a copy of Empire magazine that the girls graced the cover of. Honestly, considering all I had to go off of for that version was a couple of photos in a magazine and some blurry stills from the trailer, I think it turned out pretty damn okay.
Since then, I brought the art book, numerous HD photos have appeared online along with close up photos of the screen worn costumes from exhibits.
My next couple of attempts were also okay, but they weren’t as close as I would have liked. Hence why this 5th (maybe 6th) version is being attempted. I also thought that I’d share all my multiple resources I’ve found over the years as well this time. So buckle in for a costume breakdown of Babydoll from Sucker Punch!
The Components
First let’s start by listing exactly what parts there are in her costume starting from head to toe –

Wig + Headband
Babydoll has long platinum blonde hair tied in to two, low pigtails, with a slight side parted fringe. The fringe section is shorter than the rest of the hair and frames her face.

When Babydoll is in the fantasy world, her pigtails are longer than when she’s in reality. The end of her pigtails finish at her bust point.
There is a slight wave to the hair but nothing overly curly.
As for the headband, it appears to be made from the same fabric as the blouse (see below). There’s also conflicting images as to whether the band is the same blue as the blouse or black.

In the film, it appears to be black in most scenes but I also think this could be attributed to the heavy colour grading of Zack Snyder.
It also appears to be black in almost all of the promotional photos but once again, these are heavily edited.
However, the toys, figures and licensed costumes all come with a black headband so maybe it’s just a trick of the light that makes it appear blue occasionally.
Makeup
Babydoll’s makeup was done by Rosalina Da Silva. She said in an interview with The Beauty of Life that she “was inspired by Bridgitte Bardot with a splash of Anime characters.

One of the face charts used for Babydoll’s makeup in the sleeping chamber scene has been found online. I think it gives a great starting point for what screen accurate makeup was used. As the sleeping chamber look is just a more subdued version of her fantasy looks.

- Concealer – Kevyn Aucoin Skin Enhancer SX 02
- Concealer – Dermacolor Camouflage Palette No 3
- Blush – MAC Pink Flurry | Discontinued
- Blush – Shu Uemura Red 14
- Lip Protector – MAC Lip Conditioner
- Lip Colour – Shiseido BE 109 | Discontiued
- Mascara – Lancome | Type not specified
- Eyeshadow – MAC Kid | Discontinued
- Eyeshadow – MAC Fluidline Frostlite | Discontinued

I will be writing a full makeup tutorial on how I do my own Babydoll makeup very soon. I’ll provide a link here when it’s ready.
The Blouse + Skirt

Babydoll’s main costume is made up of a skirt and blouse based on a Japanese uniform Sailor Fuku.

I have found conflicting information online as to what fabric was used to make the costume. Some who set the costumes up in the touring exhibits said that it was made from linen, people on the RPF’s forums tend to think its made from silk noil. Both are a natural fabric that give the fabric a rough and uneven looking texture.


After studying photos of this costume for hours I think it’s safe to say it’s either silk noil or linen. The fabric appears to be soft, it has a rough nobly texture and it drapes nicely. It’s definitely NOT denim which I’ve seen a few people speculate about.
Now let’s break it down into pieces and seams ~
The Blouse

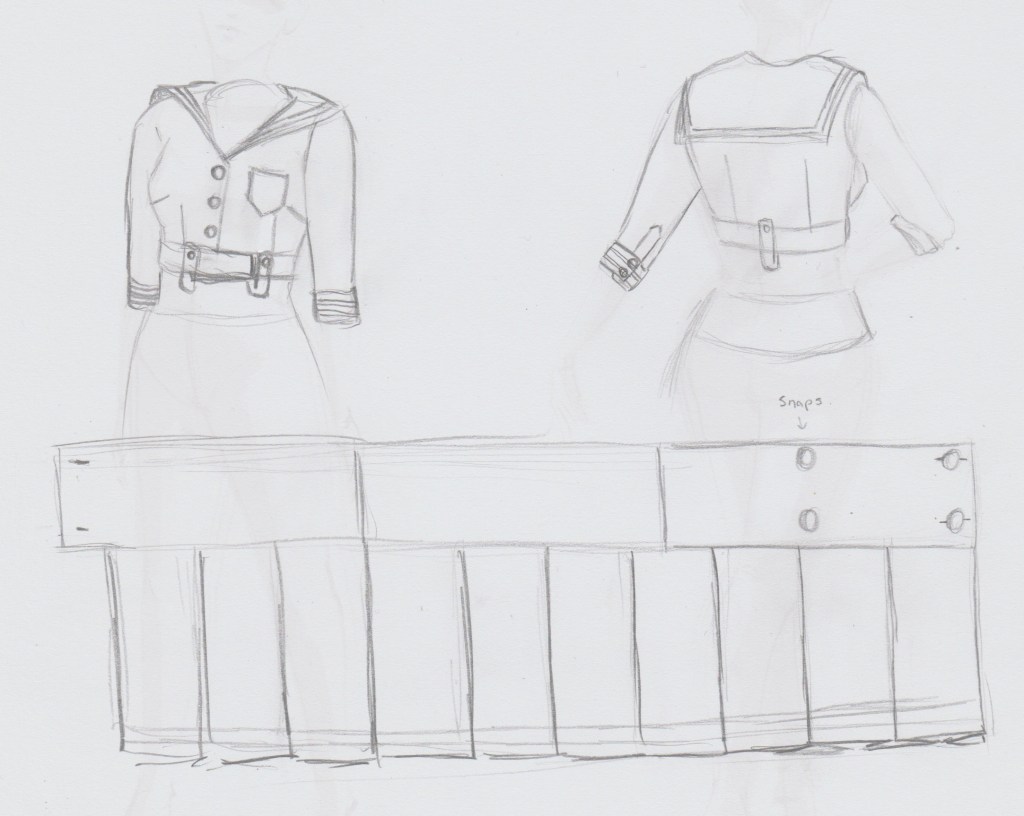
The blouse is a relatively simple button up shirt with a sailor collar. The only part that I think would differ from a normal blouse is the waistband along the bottom edge.
The blouse has four darts in the front and two in the back. The back darts and two of the front ones start from the waistband and end just below the bust point. The other two front darts start halfway down the center side seam and go diagonally up toward the bust point.

Sitting atop the waist (go figure) is a waistband. It runs along the bottom edge of the blouse and closes in the front.
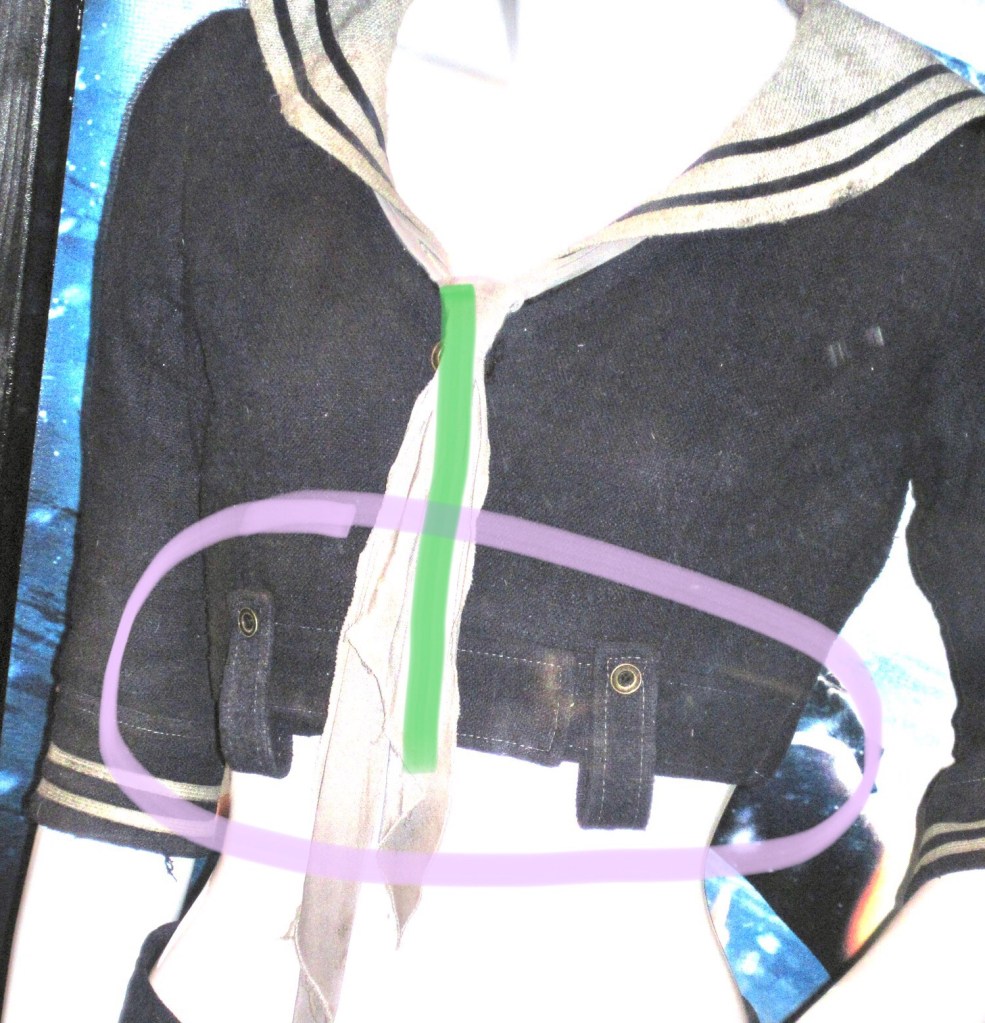

In the above photos I’ve circled the waistband in pink. On the front, you can see that the waistband closes off center to the center front (marked in green). I’m not sure as to the reason but a guess would be that its adjustable? Perhaps to have the bottom edge sitting more form fitting to the waist.
I can’t make out any seams in the band either, (well, ones that I can’t rule out that are tricks of the light or bad quality photo images). Which leads me to believe that the band is made up of one continuous piece of fabric. The band is top stitched in a contrasting thread (the same colour as the sailor collar) approximately 5mm in from the edge.
There are three belt loops that sit on the waistband. One in the center back and two in the front that sit just before the bust darts on the blouse. Once again, depending on which source image you decide to look at, they’re either attached to the band using buttons or snaps.
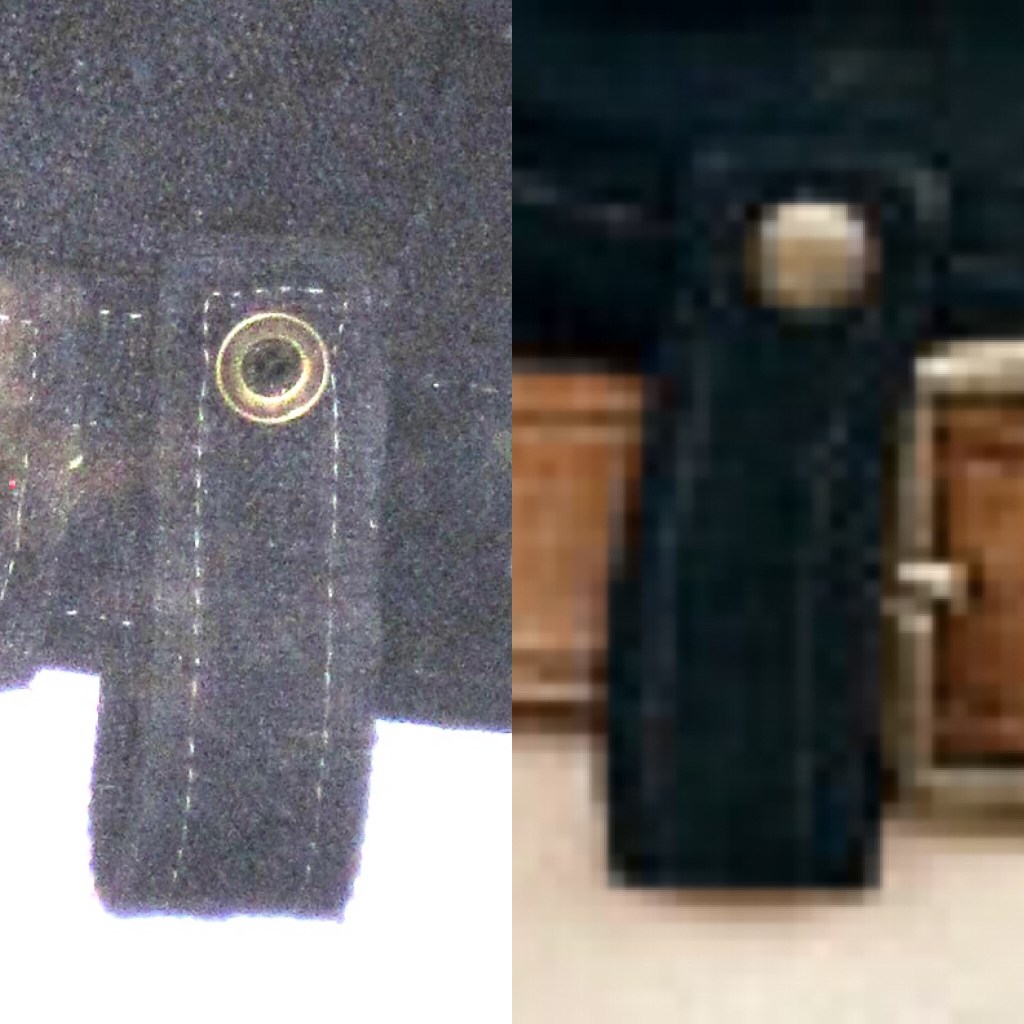
I have a feeling that there are two different versions of the top. One used for some promotional material and close ups (the hero) and one used for all the stunt work (the stunt). At any rate there’s two and they unfasten, which can be seen in some of the behind the scenes film, so we can rule out rivets.

Like the waistband, the belt loops are finished with a contrasting top stitch using the same coloured thread as the sailor collar.
The blouse buttons up in the center front using three buttons. These buttons are slightly larger than the buttons used on the waistband but still the same antique style. From studying screencaps of the film and pictures of the toys that were released, I think it’s safe to say that there are three buttons to close the blouse in the center front.


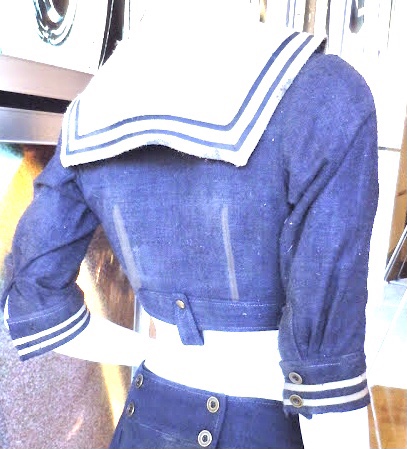
The sailor collar is made from the same type of fabric as the blouse and skirt just a stone grey colour instead of the dark navy. Though there are some reference photos that I’ve come across that makes me believe that the underside may be the same colour fabric as the blouse.

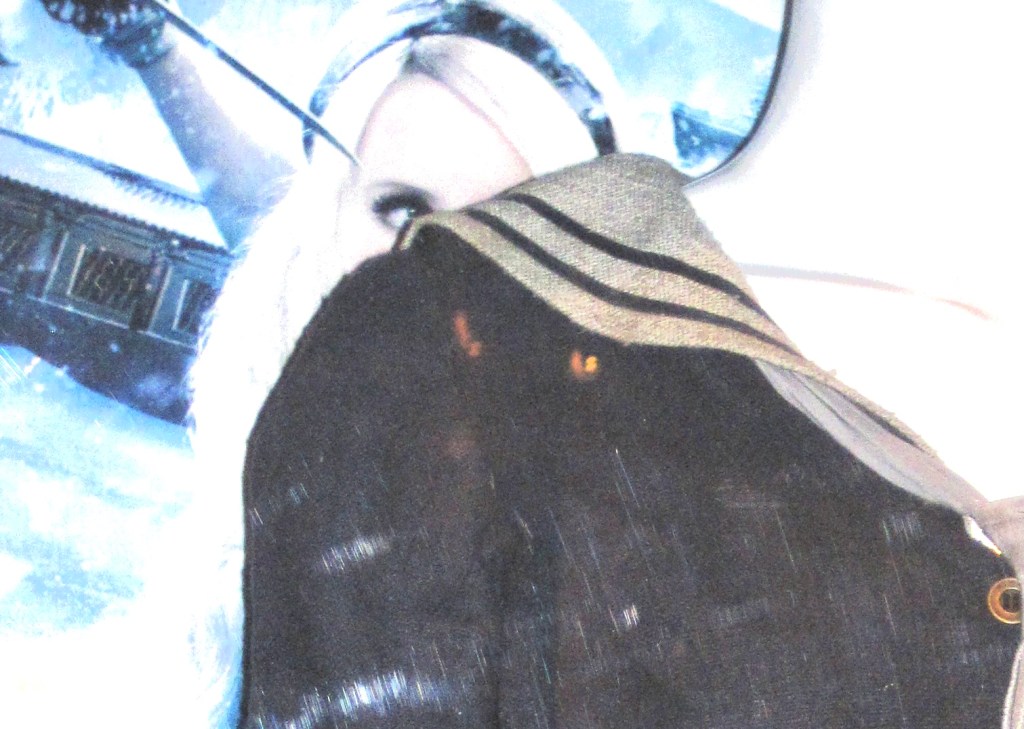
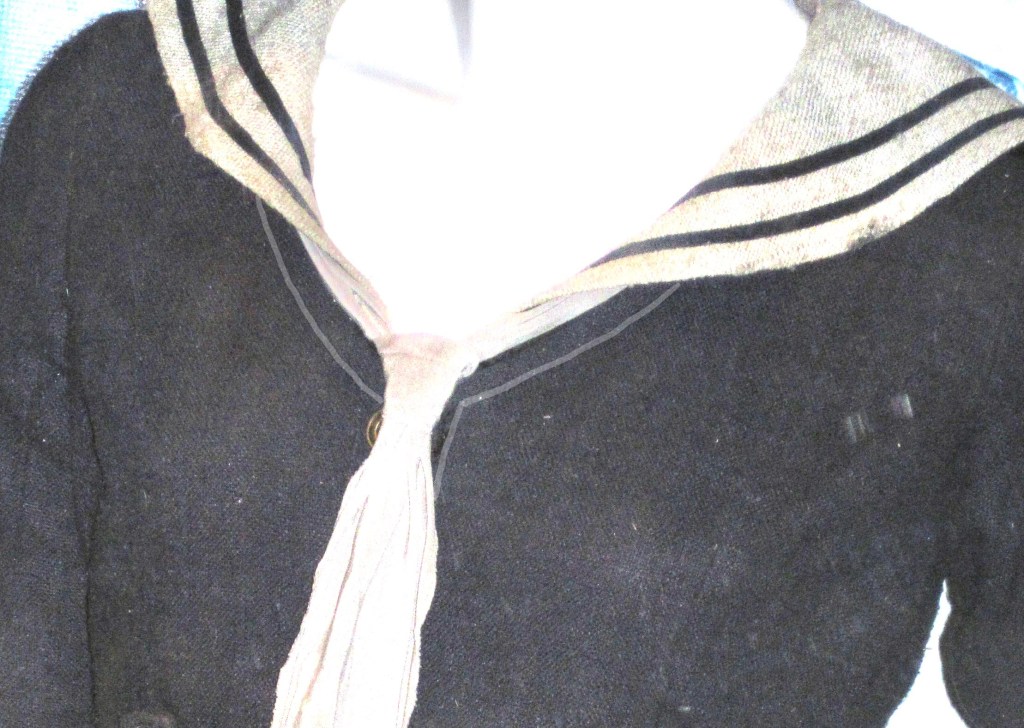
In these two photos, if you look where the collar folds and lifts up on the shoulder, and where the necktie is causing it to roll in the front, you’ll notice how dark the underside is. I believe that this is not due to lighting but because the underside of the collar is made with the same navy coloured fabric as the majority of the blouse. At any rate, the stripes on the collar definitely are made with the same navy fabric as the blouse.
I’ve estimated that the stripes on each part of the costume are made from bias strips that are around 6mm wide. The outer stripe sits 1cm from the finished edge. The second stripe is another 1cm apart from the first one.
I debated whether the stripes were sewn or printed on the the fabric but ended up deciding they were sewn due to the little divets created on either side of the stripe on the collar which wouldn’t be there if they were printed. If they were printed, you’d expect a nice smooth and even look.
Where the collar joins to the neckline of the blouse, there appears to be a top stitching line 1cm in along the edge of the blouse. I’ve tried to highlight in the photo below. The stitching is done in the same navy colour as the blouse.
The Sleeves
The sleeves are typical three quarter length dress shirt sleeves. The sleeve itself finishes just below the elbow and then has a cuff. On the back toward the inside, there is a placket followed by two small pleats toward the outer arm.
The cuffs are approximately 7cm wide. They have a contrasting top stitch along the edge where the cuff joins the sleeve. It’s 5mm in from the edge. There are two bias stripes made from the same coloured fabric as the collar. They are 6mm wide. The first stripe sits 1cm from the hem of the cuff and the second is 1cm apart from the first stripe.
There are two buttons used to fasten together the cuff. The first button sits above the top stripe and the second sits just above the second. The buttons appear to be the same size as the ones used to button up the front of the blouse which are smaller than the ones on the skirt but larger than the ones on the blouses waistband.

Where the sleeve joins to the blouse, there is a smooth edge. It fits perfectly into the shoulder. There should be no gathers or pleats here.
There is a pocket on the left side of the blouse. It has the same contrasting top stitching that is elsewhere in the uniform. It’s 5mm in from the edge and done in the same coloured thread as the sailor collar. The top of the pocket is in line with the center front point where the two sides of the blouse meet. This edge is also the only edge of the pocket that doesn’t have the contrasting top stitching.

The Skirt
The skirt is simple in theory, a waistband with 10 box pleats and a split, but then you have to use maths to figure out exactly how wide to make your pleats so that it fits you like a glove but also keeps the right amount of 10. Luckily last time I made this costume I discovered this handy website that calculates this for you ~ *click here*
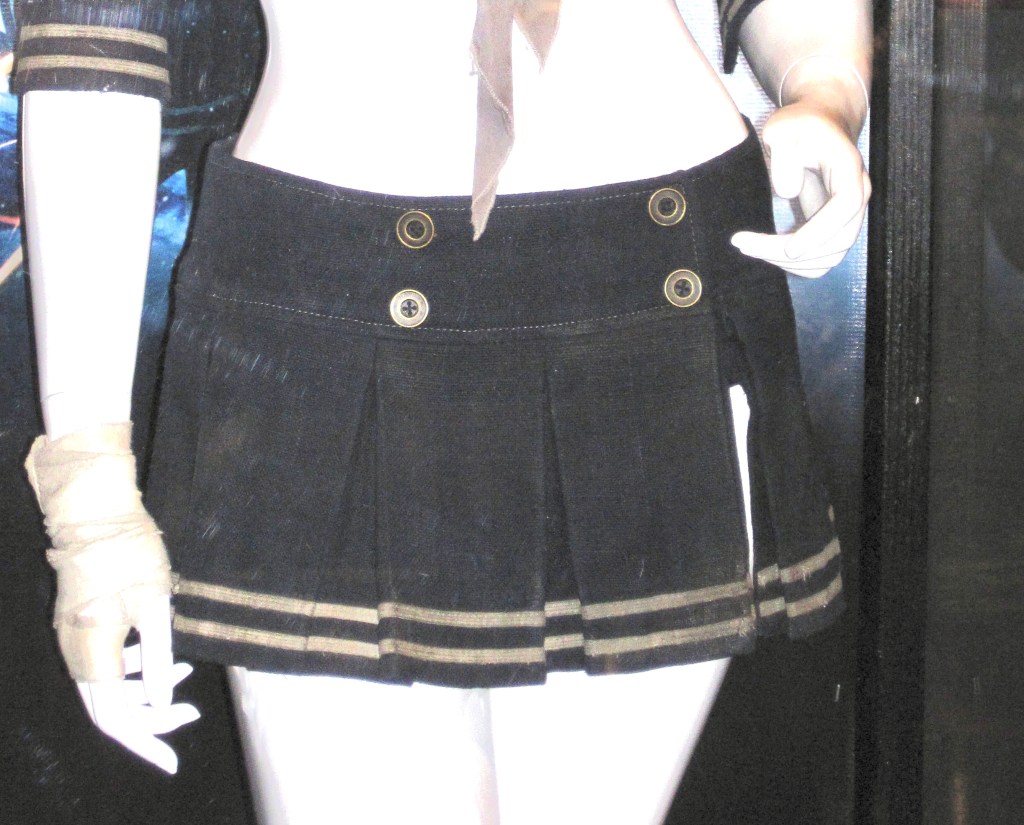
I’ve estimated the length of the pleats to be around 23.5cm from the waistband. It covers ~*just enough~*. In some shots it covers the booty and in others it shows just a tiny bit of cheek. So do whatever you’re comfortable with when making your own.


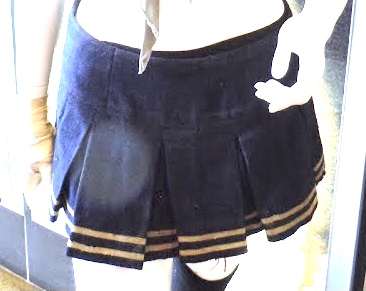
Along the hem of the of the skirt is the same stripes as the cuffs. The first one sits 1cm from the hem and the second is 1cm apart from that one. They wrap all the way around the skirt.
The pleats have a split that sits off to the wearers left side. It starts from the waist band. The pleats also have been stitched together where they connect to the waistband. This stitch is about 2cm long and would most likely be to help the pleats keep their pleatyness. I’ve marked the photo below in green to show where these stitches are.

The waistband. I’ve debated with myself so many times over this. Does it have seams or is it one continuous piece? Studying hi-res photos like the one above, I can’t see any indicator to suggest that there are seams. But there is one low res-photo that has what appears to be a side seam. Though this could also be a crease in the fabric.

This is the only photo of the skirt that I’ve been able to find with that line there and due to the fact that it kinda flattens out toward the bottom where the pleats start, and how it doesn’t sit completely form fitting to the waist on the hi-res photos, I decided that for my own version to make the waistband one continuous strip. The waistband has a decorative top stitch that is done in a contrasting thread (same colour as the stripes and sailor collar), 5mm in from the edge. It goes right the way around the edges of the band.
The finished waistband is approximately 8cm high. It connects together in the front where the pleat split is. It has four buttons the same style as all the rest used in the costume but they are the largest of the three sizes. They sit just past the pleat lines of the pleats either side of the center front pleat line. The edges of the buttons line up with the contrasting top-stitching of the waistband. I don’t think the buttons are functional because after studying the hi-res images, I can’t see any indication of a buttonhole around them.
This leads me on to how the skirt closes together in the front. Because the buttons aren’t functional and because of how flat that front part sits, I think there must be a closing mechanism directly behind the buttons closest to the waistband end. This could be snaps, hook and eyes or even hidden buttons on the inside. I used large snaps in my own recreation.
Necktie
Aka neckerchief. It’s made from some sort of flowy, light fabric. My guess would be some sort of silk because of the slight sheen it has in some photos and also how the flash lights have reflected off it. This also changes the colour of it. In non-flash photos, it’s a darker grey than the sailor collar fabric but in flash photos, it’s lighter. Once again I think this is because of the light from the flash bouncing off of the fabric.
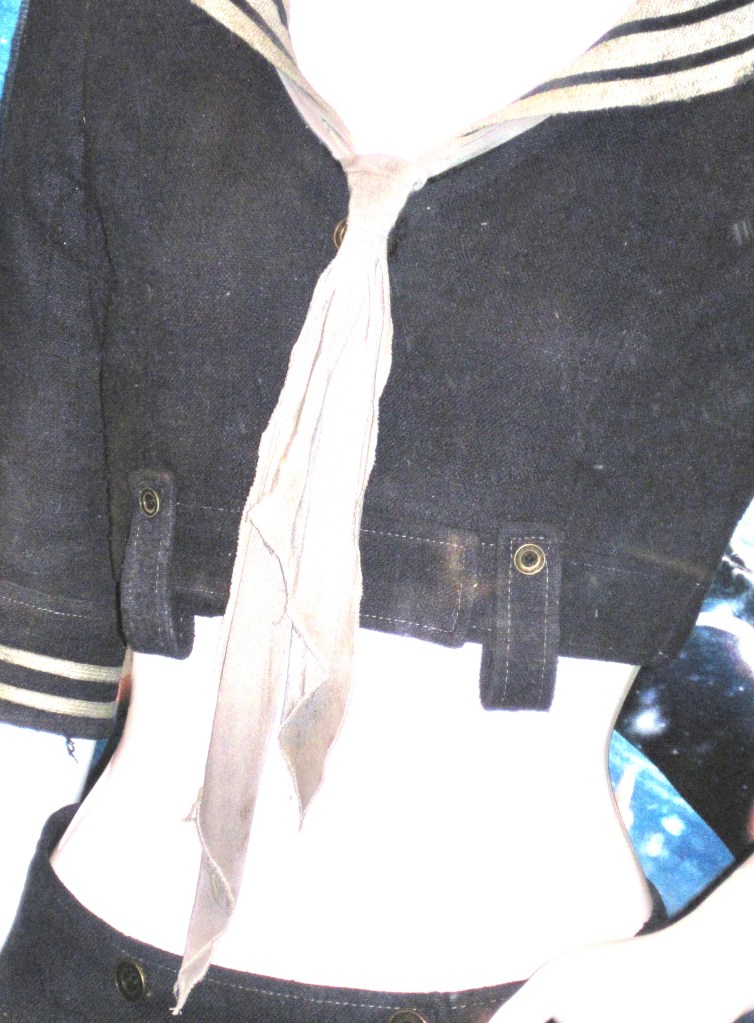

It looks to be a piece cut on the bias to a standard neckerchief shape, with a zigzag stitch on the edge in a slightly lighter thread colour, to finish them.

It ties in a standard Windsor knot which sits at the top edge of the blouse in the center front. The shortest point of the tie hangs inline with the bellybutton and longest is in line with the top buttons on the skirt.
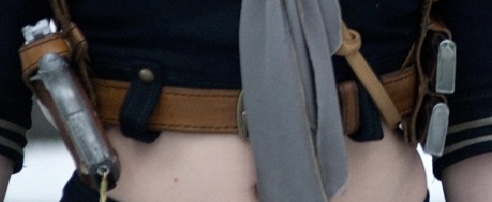
Gun Harness + Waist Belt
Made from a thick leather hide in a light tan colour. Unfortunately, this part of the costume has never been on display any time the costume has been in exhibitions so all we have to go on for references are the shots from the film and the toys.


The harness is made of two large loops that go over the shoulders. These loops taper in toward the shoulder and get wider at either end. The loops are connected to each other in the back with two smaller widths of leather that cross-cross across the back forming an ‘X’. The top of the ‘X’s are sewn to the shoulder loops and the bottom parts are attached to the shoulder loops via gold rivets with tails left to over hang on the loops.

On the left of the harness, there are two pouches for extra ammunition for the gun. On the right, there is a holster for her gun. The holster has a gold snap that fits around the handle of the gun to keep it in place. Both of these (the holster and ammo pouches) are sewn to a piece of leather that is rectangular in shape with the top edge being rounded in shape. This rectangle shape is attached to the shoulder loops so that it sits under the arms. It is attached via two pieces of leather thonging which are tied in a knot through all the layers and left with generous tails.
The edges of all the pieces have been top stitched in about 5mm from the edge in a black long stitch.
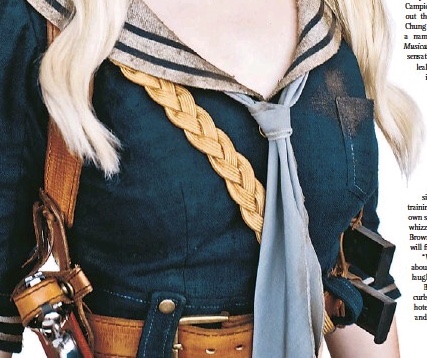
The waist belt is made from the same leather as the harness. It attaches to the harness via two loops that are on the back of the holster and ammo pouch sections. It has the same black top stitching about 5mm in from the edge. It has a large antique bronze, square buckle that points toward the right. On the left of the buckle is one belt loop. This is also top stitched in black.

Shoes + Stockings + Handwrap
Stockings
The stocks are sheer black thigh high stockings. They have a thick black opaque band at the top. They sit at about the mid thigh point.
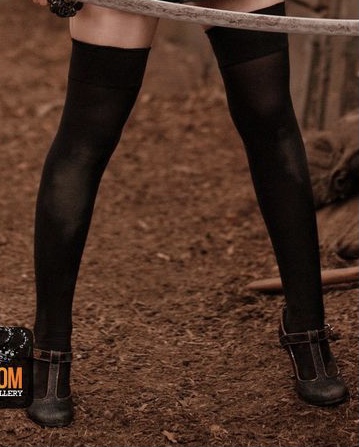
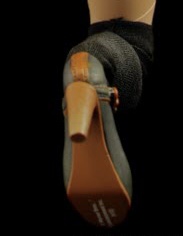
Shoes
The shoes are black leather, high heeled, Mary Jane’s with a T-Bar strap. The edges are finished with brown leather glue.
There is a strip of brown leather at the back of each shoe. The heel and sole of the shoe are also brown.


Handwrap
Babydoll wears what appears to be a bandage of her right hand. It’s made from strips of some sort of off-white coloured cloth. The cloth is approximately 3cm in height. The edges are raw and frayed and the whole wrap has been weathered considerably.


Weapons
Gun
Babydoll’s gun is a personalised M1911A1 pistol. It is polished, nickle plated with engravings on either side. The engraving is different on either side. Both starting with the letter ‘B’, one side features a rabbit, flowers and cherries and the other a skull with a lobotomy pick.

There are five charms that hang from the lanyard ring. They are a bunny, baby’s bottle, skull with a bow, brown bear with buttons for eyes and an hourglass. They hang from the gun via a gold thread.


She has two rounds of spare ammunition that she keeps in her holster harness.
Sword
Babydoll wields a katana, a traditional Japanese sword. The sword according to property master, Jimmy Chow, has a wakizashi blade with a katana handle reduced in girth to be proportionate to Emily Browning’s small hands and stature.

The sword has a handle of black manta ray skin which is covered with oiled brown leather. There are hand-sculpted bronze menuki, charms hidden beneath the leather wrappings toward the guard.

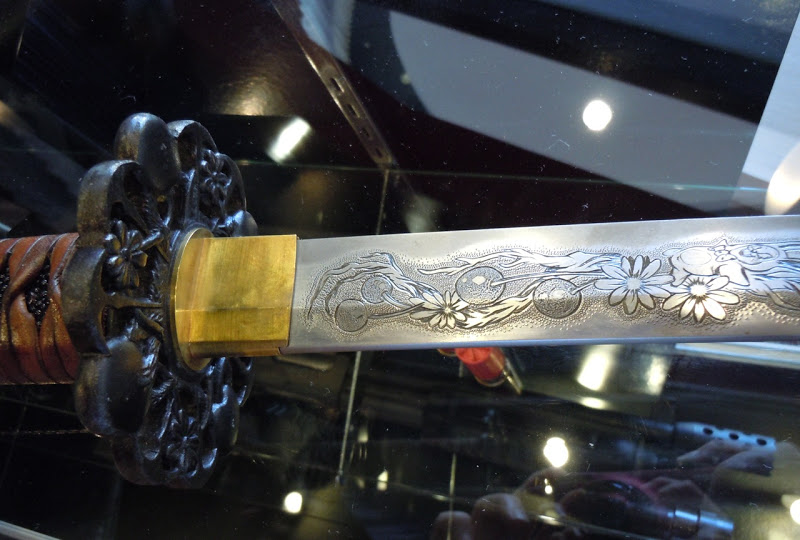

The sword guard is a hand-carved tsuba. It features cherries and flowers.

The scabbard or saya, is made from a light, reddy-brown lacquered wood. It has a pattern of gold snow-flakes evenly spaced in an isometric pattern.

A gold braid sash is used to fasten the sword to the gun holster. The sash ties around the bottom edge of the scabbard and through the loop on the top of the scabbard. They both have tails left hanging. Only a small portion of the sash is braided as well. This is a piece that crosses over the bust and the two parts where it ties to the scabbard in the back.


There is an engraving either side of the sword blade. From what I can make out, it appears to be the same on both sides.
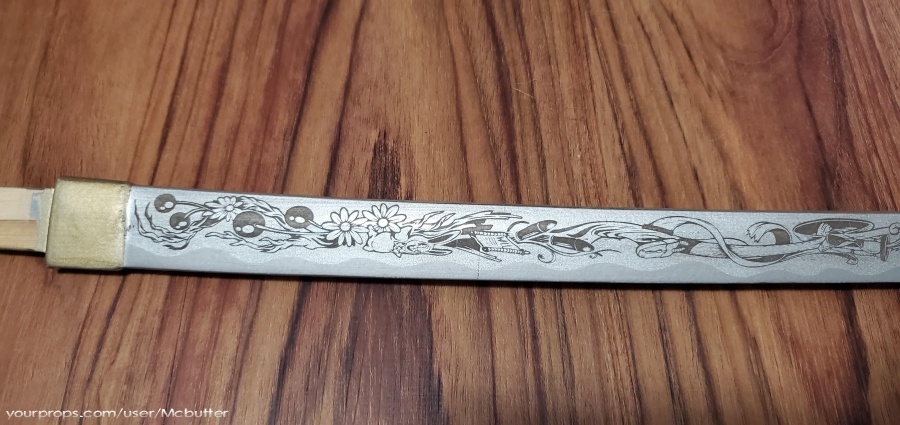
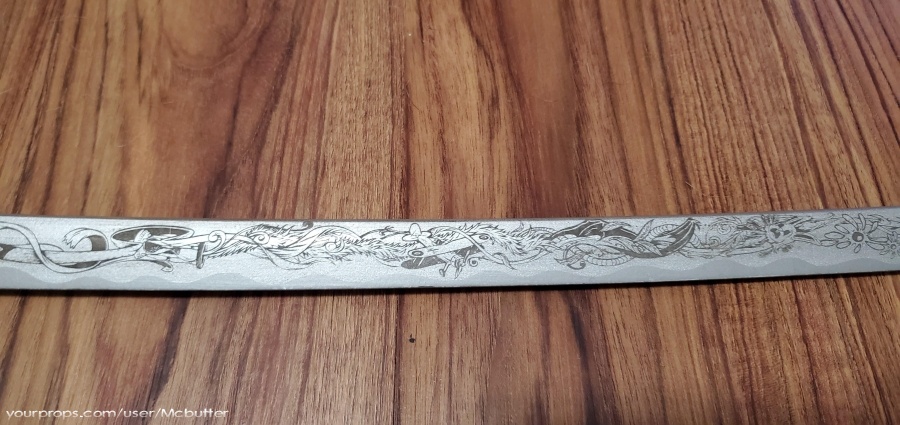

I’m in the process of finalizing the drawings of my own decals for the sword and gun and will have them for sale on my Etsy once they’re done.

Helpful Websites
- Pleated Skirt Calculator – for calculating your box pleat width and how much fabric you will need.
- RPF Sucker Punch costume thread – a little old and full of broken links, but lots of handy construction details from a lot of people who have made the costumes before.
- Interview with Sucker Punch Makeup Artist Rosalina Da Silva
- Babydoll’s Weapons – A write up on Babydoll’s weapons by someone who knows what they’re talking about.
